September 19, 2012 admin No Comments on Comic Book Tutorial
Comic Book Tutorial
It’s always been my dream to make my own comic book. I’m a big fan of comic book cartoonists, their skill and different technique amaze me. I’ve sketched and colored my work on Adobe Photoshop but I have not been able to capture the same look and feel of the real work of a comic book cartoonist. Since I’ve tried numerous times and took a closer look at the work of a number of comic book greats, I think I finally found a less artistic way to imitate their style using Adobe Photoshop.
In this tutorial, we will to turn this photo into a comic book cover (image from The Dark Knight)
Make sure your resource photo is at least 500 x 500 pixels

Select your Brush Tool, then select a round tip brush without feathered edges, set the diameter to 3 - this may vary depending on your resource photo.

You will need three layers to start:
- Right click on the base layer, and select Layer from Background. Rename it asBase and click OK
- Add a second layer below the Base layer and name it bgWhite. This layer will be your guide, to see your Lineart against a white canvas.
- Add a third layer, but this time it will be placed right above everything and rename it as Lineart.
This is how your Layers palette should look like

Select the Pen Tool and click the Paths option under the main Menusettings section.

Reset your foreground and background color palettes to black and white by pressing D on your keyboard.
Select your Paths option to avoid having a vector shape layer or shapes filled with the foreground color.
Begin creating the outline of your image by tracing around it using your Pen Tool.

In case you’d like to take on a much detailed approach, change your brush diameter to a smaller number.
Tip: To check if you’re tracing on the right spot, toggle the visibility icon ![]()
Don’t worry! You don’t have to trace everything in one go, skip the complicated parts for now.
Once you’ve done your main outline, hit right-click for the context menu to pop-up and select Stroke Path
Another pop-up menu will appear, select the Brush option and then clickOK. The path outline you’ve made will be in the current foreground color (black)

Making sure that your Lineart layer is selected, click on Filter, select Sharpenand click on Unsharp Mask.
Move the value to 150 on the pop-up menu, leave Radius and Threshold as is and click OK.
The outline should look like this:

You can exit the Paths’ view by pressing ESC twice on your keyboard, but note that once you’ve exited you will not be able to edit your paths again.
Toggle off your Base layer’s visibility to see how your Lineart layer looks so far. Everything visible should be traced but leave out all darker areas.
This is what I have so far:

We will continue the eye area later on in the tutorial since we still have the black or dark areas of the Lineart layer
Close out a path with your Pen Tool to create custom shapes for the dark or black areas of your resource photo, like the image below.
Right click again and with your Pen Tool selected do either of the following:
- Select Make Selection then check if the Feather Radius field is set to 0. Click OKand hit ALT+Backspace to fill it with black.
- Select Fill Path and check if the Use drop-down menu has Foreground Colorselected and hit OK
Either of these steps will have this result:
Repeat steps 3 and for to get this as a result:
This is how my final Lineart layer looked like:

Lets add more detail!
Select the Brush Tool, and modify the brush diameter by clicking the options button of the Brush Tool which is located at the top-right hand corner of the Photoshop IDE that has this icon ![]()
This Menu should appear:

On Brush Tip Shape, click on 1 diameter
Next click on the Shape Dynamics field.
On the Control drop-down menu, select Fade and enter 250 for its value, again, this may vary depending on the size of your images so try and experiment a little.
This will add a fading effect to your brush from the initial diameter of 1 pixel until it becomes transparent and fades out completely within a distance of 250 pixels.
Create a new layer and rename it Scratchlines
Begin tracing small lines a few pixels beside your dark/black areas. Remember that the first anchor point is 1 diameter and the end of your path will fade.

Be creative and add scratch lines where you see fit, like so:
Create a new layer and name it Color, drag this layer below the Lineart layer to avoid coloring the new layer. This is how your layers window should look:

Next select the Lineart layer and with the Magic Wand tool, select a black area on your Lineart layer.

Notice that not all parts of the Lineart layer are selected. To include those areas you will need to expand the selection. Go to the main Menu bar, click on Select – Modify – Expand add a 1-pixel expansion.

In case there are still areas of the Lineart layer that isn’t selected use thePolygonal Lasso Tool and manually select those specific areas. Make sure to hold down Shift to add your manually selected areas to the selection you’ve already made with the Magic Wand.
With the Color layer selected, fill the area with the desired color. For this design I chose #3b3b3b.

To be sure of th skin color, I searched “Caucasian Skin Color Palette” on Google.com and found this palette.

I used the last color on the right of the palette #facbb4, ending up with this as a result:
Adding life to an artwork is as simple as doing a little shading here and there. Normall old comic books stick to flat colors but today, all comic books are shaded for more dimension.
Duplicate the Color layer and rename this layer as Color2 – this layer will be your back up, in case you are not happy with the results of your shading. Use the original Color layer for shading and keep Color2 layer invisible.
Click on the Burn Tool and follow these settings:
![]()
First make sure that the Color layer is selected, using the Burn Tool begin shading around the edges of your image.

To make your image look “solid,” you have to shade the sides of your image first before looking at your Base layer for more shading reference. Remember to switch between the Dodge and Burn Tools to lighten or darken your colors, respectively. Also, you can adjust your Brush Tool’s diameter for thinner color shades.

Once your satisfied, duplicate your shaded Color layer, set Blending Option to Color Dodge
Once your satisfied, duplicate your shaded Color layer, set Blending Optionto Color Dodge.
This is how my artwork turned out:
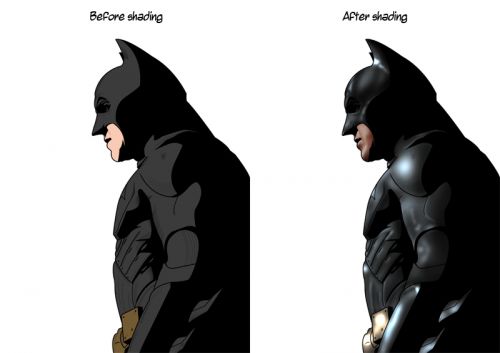
Here is a comparison, the image on the left is without shading and the image on the left is with shading:
Next, select the entire Lineart layer by holding CTRL and clicking the Lineartlayer thumbnail and the Color layer by holding Shift+CTRL+clicking theColor layer thumbnail and made a selection like this:

Then create a new layer and name it Overlay and fill it with this color#222c32
Change the Blending Options to Soft Light.

I suggest you guys experiment with the Blending Options to get different effects that might work better.
On to the background!
I downloaded a stock photo of New York City scape at night.
We still need to add a comic book-like effect to the background image. Select the background image and rename it Background proceed to the main Menu, select Filter>Blur>Gaussian Blur. Set the amount to 1 pixel. Doing this will give more focus to our subject, in this case Batman.
With the Background layer selected, press CTRL+J to duplicate the layer.
On the Filter Menu, located on the main Menu, select – Stylize>Find Edges.
Proceed to the Blending Options again and select Multiply – this sets all white areas of a layer to transparent.

Next, set the opacity of the Background copy to 70%
Create another layer above the main Background copy layer and add the this color #232c33.
Then set the Blending Mode to Soft Light to get this effect:
Finishing touches all depend on you, I decided to add rain, read on if you’d like to do the same.
The droplets are made out of Pen Tool strokes with a faded brush setting. I also added my signature (a real one, on the bottom-left corner of the image) for a more “artwork” feel.
Next I added a few logos, a random barcode, and a cheesy title for this particular “comic book.”
Disclaimer:
All content provided on this blog entry is for informational purposes only. The owner of this blog makes no representations as to the accuracy or completeness of any information on this site or found by following any link on this site. The owner will not be liable for any errors or omissions in this information nor for the availability of this information. The owner will not be liable for any losses, injuries, or damages from the display or use of this information.
This policy is subject to change at anytime.